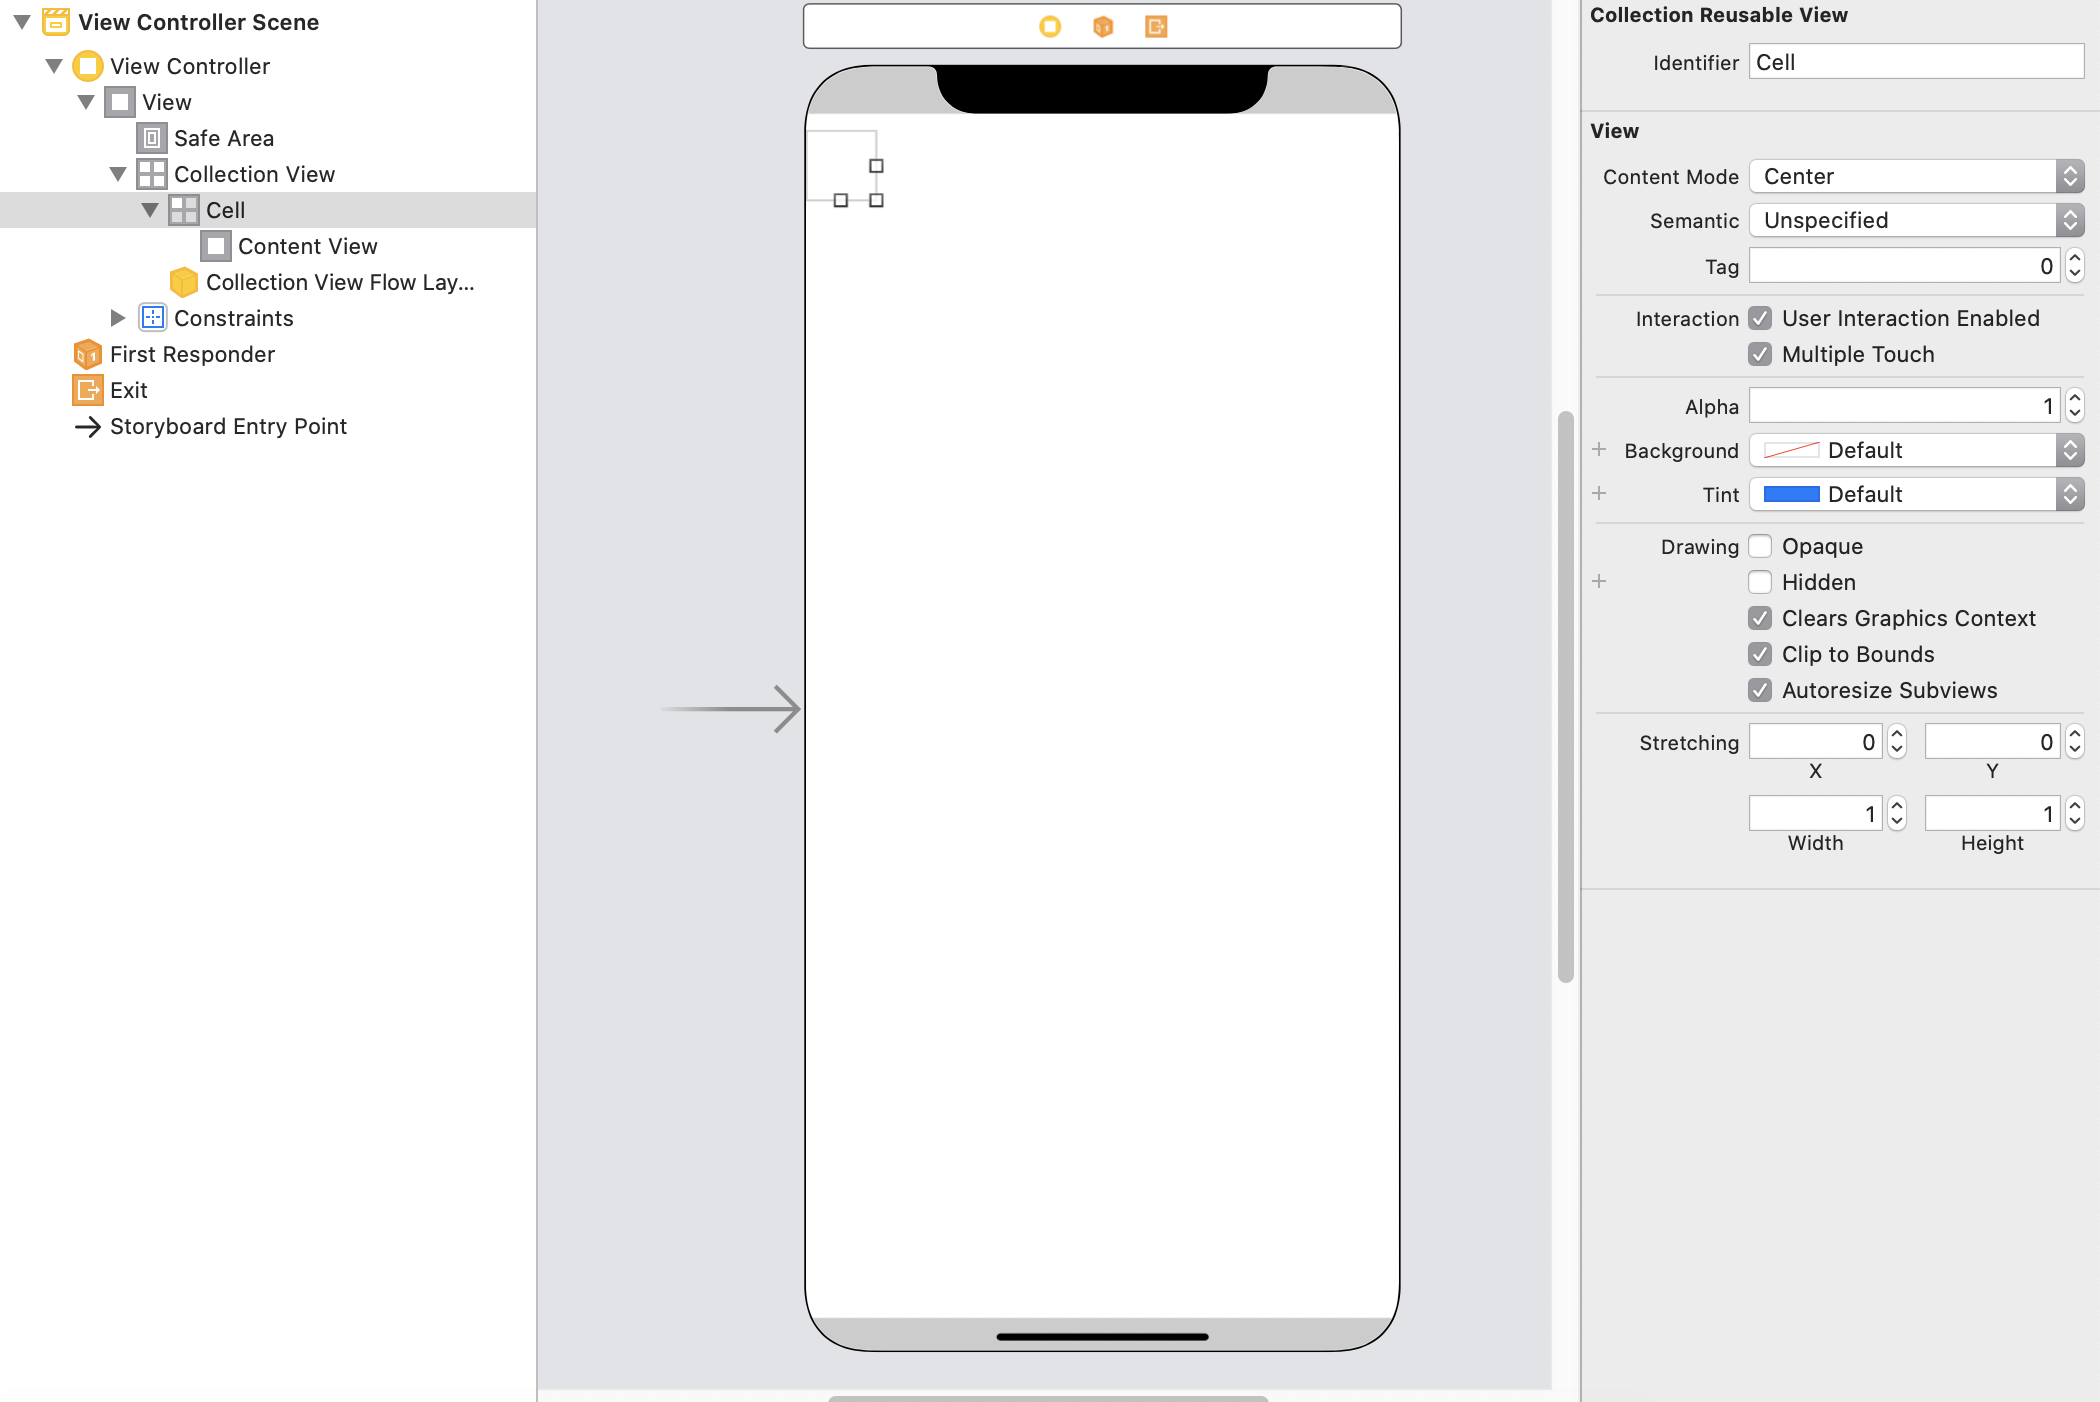
1.collectionViewを画面一杯に配置する。CellのIdentifierに任意の名前「Cell」とつける。
2.プロトコルを追加し、デリゲートの設定をする。
class ViewController: UIViewController,UICollectionViewDataSource, UICollectionViewDelegate, UICollectionViewDelegateFlowLayout {
UICollectionViewDelegateFlowLayoutはレイアウトに関するものなので、レイアウト調整をしたい時に使う。必須ではない。
デリゲートの設定をする。
CollectionViewにマウスを合わせて、ViewControllerの黄色い丸までcontrolキーを押しながらドラックアンドドロップ。
「dataSource」と「delegate」を設定する。
コードで設定することもできる。
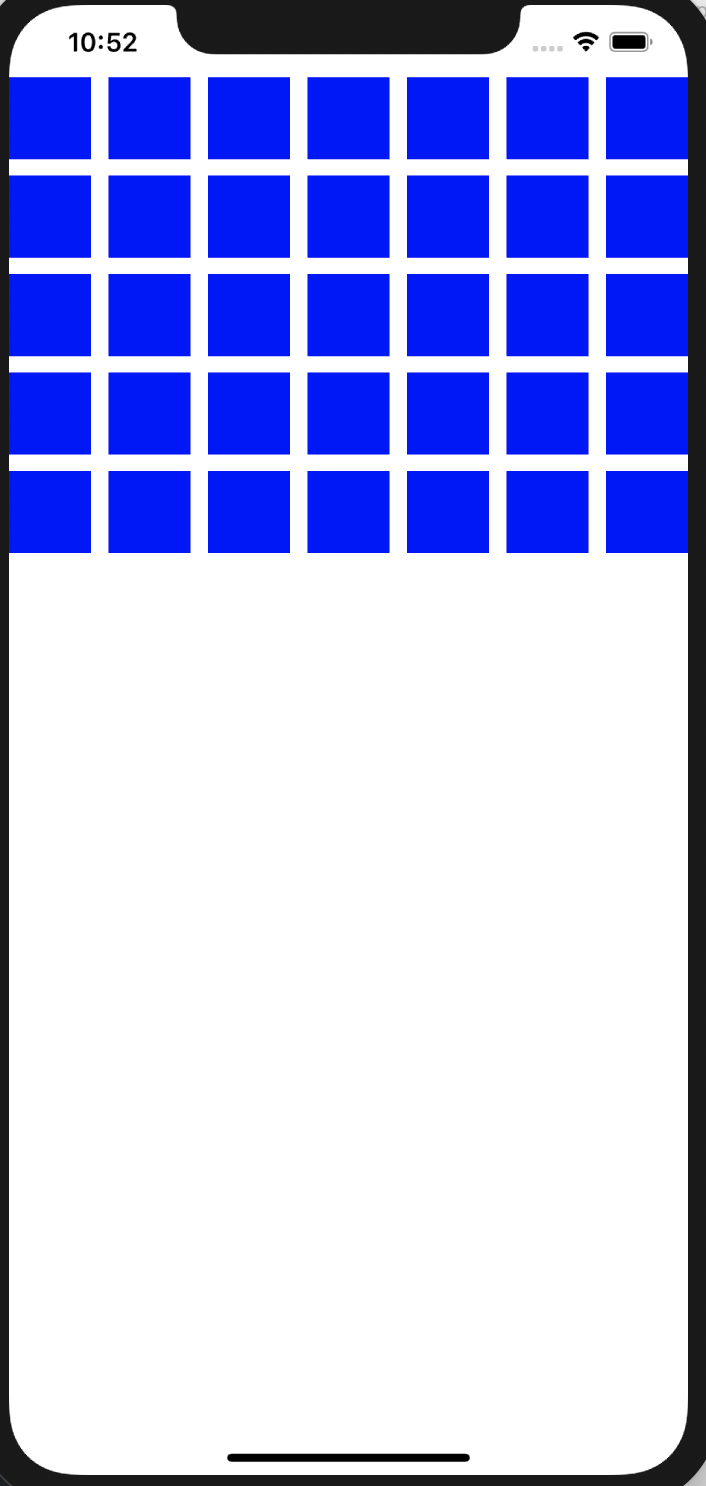
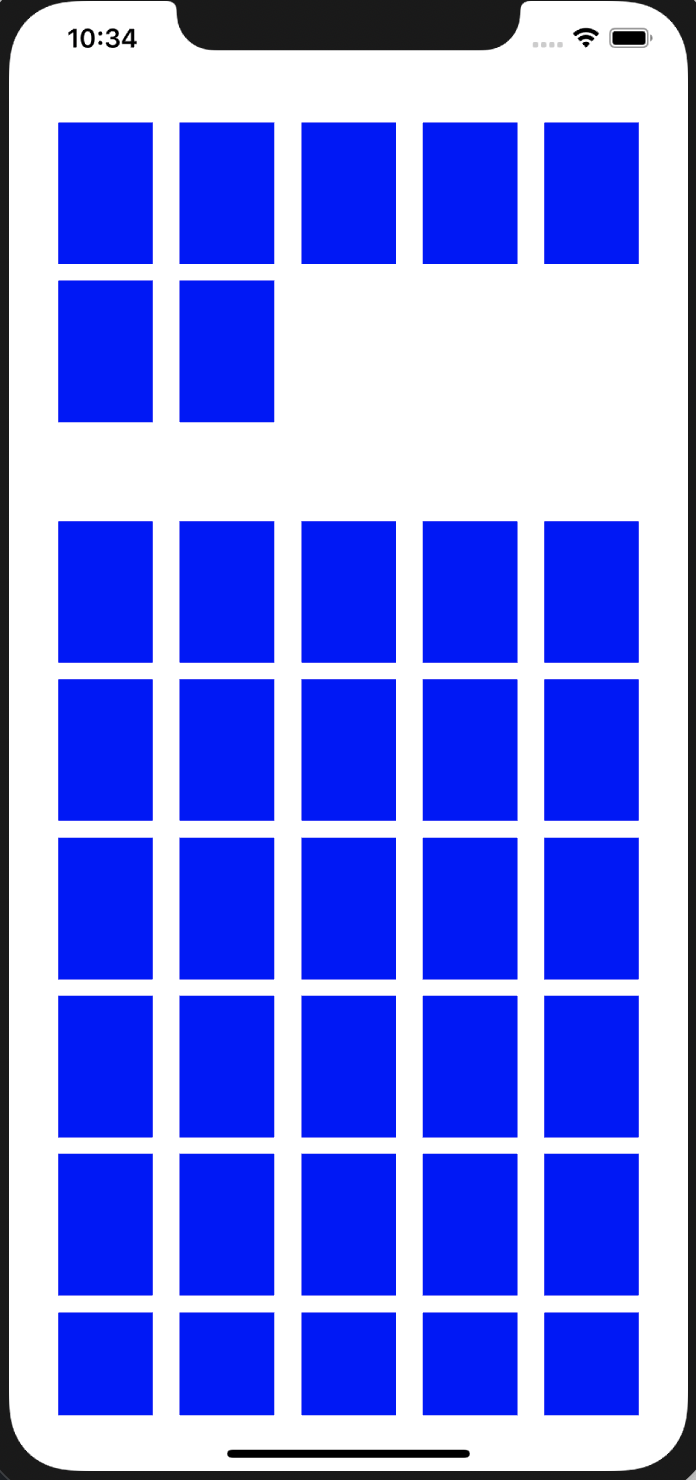
3.必須のメソッドを書く
以下の必須のメソッド2つを書く。
 //セルの数
    func collectionView(_ collectionView: UICollectionView, numberOfItemsInSection section: Int) -> Int {
        return 35
    }

    //セルの情報を入れる
    func collectionView(_ collectionView: UICollectionView, cellForItemAt indexPath: IndexPath) -> UICollectionViewCell {
        //表示するセルの登録
        let cell = collectionView.dequeueReusableCell(withReuseIdentifier: "Cell", for: indexPath)
        cell.backgroundColor = .blue //セルの色

        return cell
    }
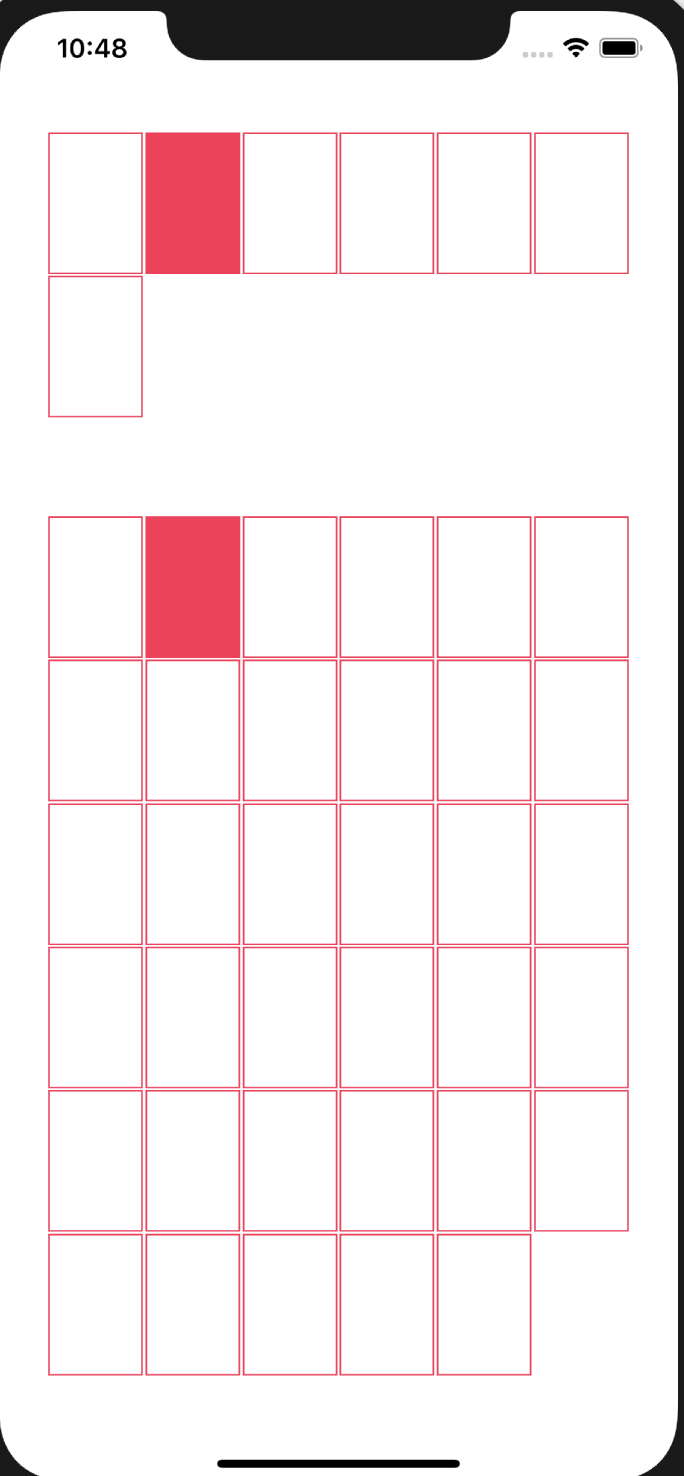
4.レイアウトの調整をする
あとは適宜レイアウトの調整。
・セクションを追加
セクションを2つにして、セクションごとにセル数を変えてみた。
//セルの数
    func collectionView(_ collectionView: UICollectionView, numberOfItemsInSection section: Int) -> Int {
        if section == 0 {
            return 7
        } else {
            return 35
        }
    }

    //セルの情報を入れる
    func collectionView(_ collectionView: UICollectionView, cellForItemAt indexPath: IndexPath) -> UICollectionViewCell {
        //表示するセルの登録
        let cell = collectionView.dequeueReusableCell(withReuseIdentifier: "Cell", for: indexPath)
        cell.backgroundColor = .blue //セルの色

        return cell
    }
・セクションやセルのレイアウトを変更
セクションのマージンを上下左右30にした。
セル同士の距離はデフォルとで10pxとなっている。1pxに変えた。
またセクションごとにセルの数を変えた。
    override func viewDidLoad() {
        super.viewDidLoad()
        //レイアウトを調整
        let layout = UICollectionViewFlowLayout()
        //セクション間の距離
        layout.sectionInset = UIEdgeInsets(top: 30, left: 30, bottom: 30, right: 30)
        //セル同士の列の距離(最小値)
        layout.minimumInteritemSpacing = 1
        //セル同士の行の距離(最小値)
        layout.minimumLineSpacing = 1
        collectionView.collectionViewLayout = layout
    }

    //セルの数
    func collectionView(_ collectionView: UICollectionView, numberOfItemsInSection section: Int) -> Int {
        if section == 0 {
            return 7
        } else {
            return 35
        }
    }
・境界線、特定のセルの色を変える
//セルの情報を入れる
    func collectionView(_ collectionView: UICollectionView, cellForItemAt indexPath: IndexPath) -> UICollectionViewCell {
        //表示するセルの登録
        let cell = collectionView.dequeueReusableCell(withReuseIdentifier: "Cell", for: indexPath)
        cell.backgroundColor = .white //セルの色
        //2つ目のセルの色のみ変更
        if indexPath.row == 1 {
            cell.backgroundColor = .systemPink
        }
        //境界線
        cell.layer.borderColor = UIColor.systemPink.cgColor
        cell.layer.borderWidth = 1

        return cell
    }
全てのコード
import UIKit

class ViewController: UIViewController,UICollectionViewDataSource, UICollectionViewDelegate, UICollectionViewDelegateFlowLayout {
    @IBOutlet weak var collectionView: UICollectionView!

    override func viewDidLoad() {
        super.viewDidLoad()
        //レイアウトを調整
        let layout = UICollectionViewFlowLayout()
        //セクション間の距離
        layout.sectionInset = UIEdgeInsets(top: 30, left: 30, bottom: 30, right: 30)
        //セル同士の列の距離(最小値)
        layout.minimumInteritemSpacing = 1
        //セル同士の行の距離(最小値)
        layout.minimumLineSpacing = 1
        collectionView.collectionViewLayout = layout
    }

    //セクションの数
    func numberOfSections(in collectionView: UICollectionView) -> Int {
        return 2
    }

    //セルの数
    func collectionView(_ collectionView: UICollectionView, numberOfItemsInSection section: Int) -> Int {
        if section == 0 {
            return 7
        } else {
            return 35
        }
    }

    //セルの情報を入れる
    func collectionView(_ collectionView: UICollectionView, cellForItemAt indexPath: IndexPath) -> UICollectionViewCell {
        //表示するセルの登録
        let cell = collectionView.dequeueReusableCell(withReuseIdentifier: "Cell", for: indexPath)
        cell.backgroundColor = .white //セルの色
        //2つ目のセルの色のみ変更
        if indexPath.row == 1 {
            cell.backgroundColor = .systemPink
        }
        //境界線
        cell.layer.borderColor = UIColor.systemPink.cgColor
        cell.layer.borderWidth = 1

        return cell
    }

    //セルの大きさ・隙間を調整する関数
    func collectionView(_ collectionView: UICollectionView, layout collectionViewLayout: UICollectionViewLayout, sizeForItemAt indexPath: IndexPath) -> CGSize {

        let width = UIScreen.main.bounds.width / 7 - 1.5
        let height = width * 1.5

        return CGSize(width: width, height: height)
    }
}
参考:https://rara-world.com/swift-collection-view-programming/